Access Mem Anywhere
Connect any machine or agent to your Mem with a secure URL + API key.
Nowledge Mem runs on your machine, so your data never leaves your control. Access Anywhere lets you reach that same instance from any other device, agent, or browser through a secure tunnel.
One Mem, many ways to connect: your laptop at a coffee shop, a browser tab on your phone, a coding agent on a CI runner, AI Now on a second desktop. The Mem on your always-on machine is the hub. Everything else connects to it.
This is also how sync works in Mem today: one always-on Mem instance, many connected clients. If you want the short product explanation first, read Sync Across Devices.
Plus and Max include Nowledge Link
If you subscribe to Plus or Max, open Settings → Access Anywhere and turn on Nowledge Link. Mem creates the stable link for you; you do not need to own a domain or configure Cloudflare. The manual Quick link and Cloudflare account paths below remain useful for Lifetime Pro users, servers, and advanced BYO-domain setups.
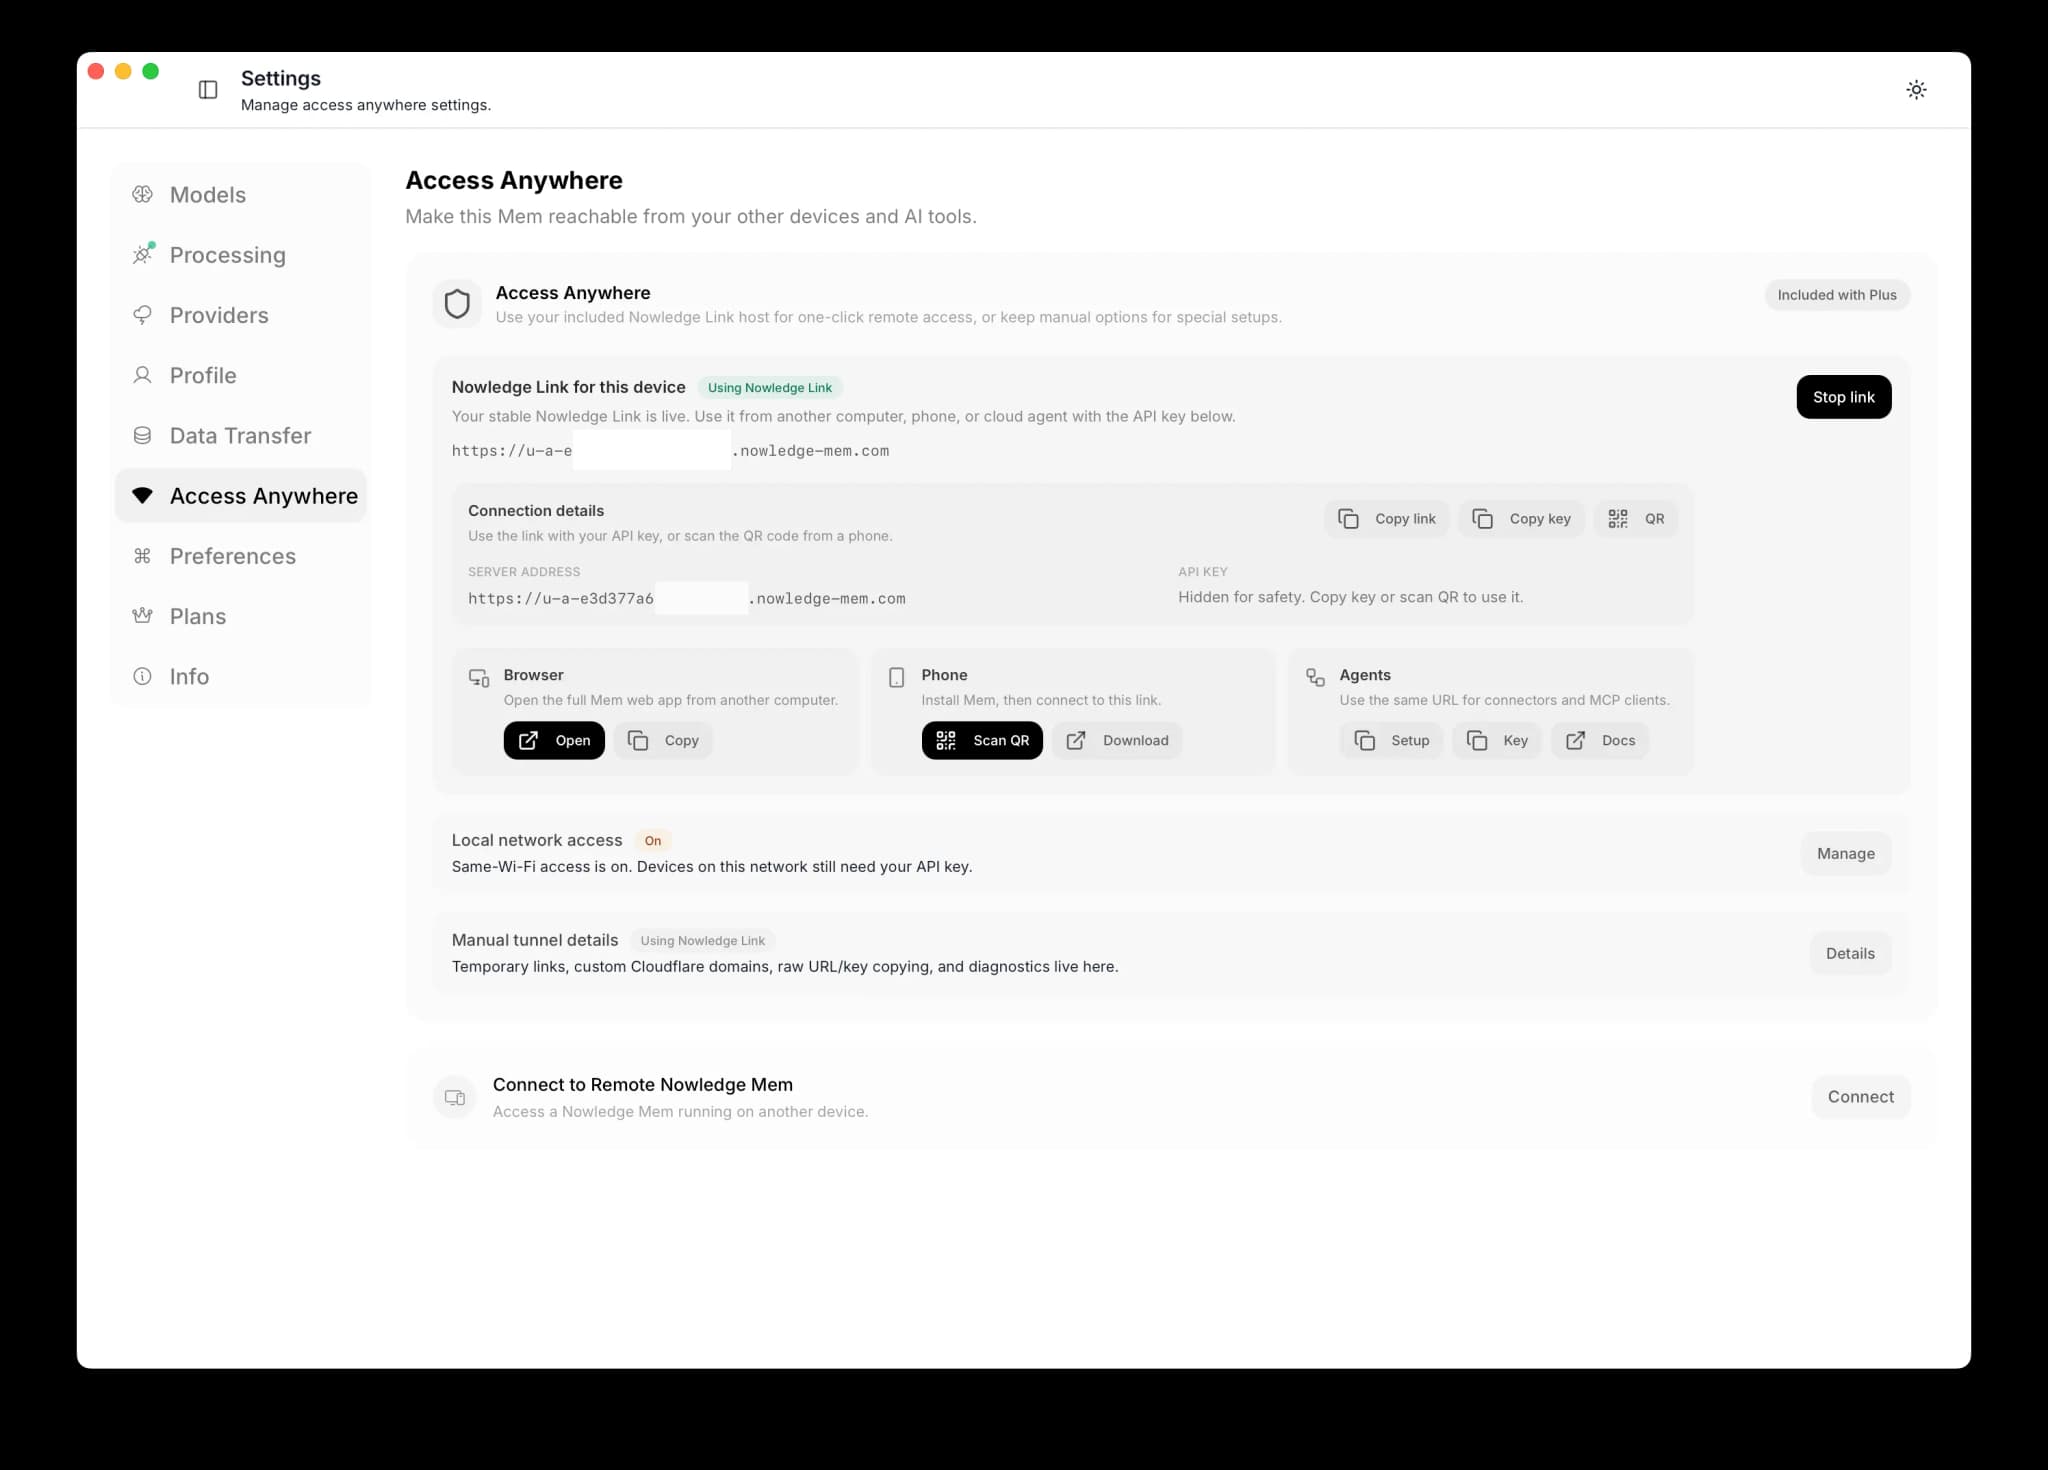
The recommended setup
Run Nowledge Mem on an always-on device, such as a Mac Mini, a Linux server, or a desktop that stays powered on. Then connect from everywhere else: a second laptop, a web browser, or the iOS mobile app. This gives you 24/7 access to your knowledge base, background intelligence that keeps running, and a single source of truth for all your tools and devices.
Choose Your Connection Type
| Type | Best for | What URL you get |
|---|---|---|
| Nowledge Link | Plus and Max users who want one-click setup | Stable *.nowledge-mem.com URL |
| Quick link | Fast setup in under a minute | Random *.trycloudflare.com URL |
| Cloudflare account | Daily/long-term usage | Stable URL on your own domain (for example https://mem.example.com) |
Before You Start
Important
Open this guide from Settings → Access Mem Anywhere → Guide.
- Nowledge Link requires an active Plus or Max subscription and sign-in inside Nowledge Mem.
- Quick link needs no Cloudflare account and no domain.
- Cloudflare account mode requires a domain already managed in your Cloudflare account.
- If you do not have a domain in Cloudflare yet, use Quick link first.
- In Cloudflare account mode, the final public URL appears only after you create a hostname route.
nmem TUI path
If you are on a server/terminal workflow, open nmem tui → Settings tab → Access Anywhere.
You can configure stable link, start/stop tunnel, rotate/reveal key, and view terminal setup there.
Important for TUI
Access Anywhere management APIs are local-only.
If your shell is pointed at a remote Mem (NMEM_API_URL=https://...), temporarily switch back to local (http://127.0.0.1:14242) before configuring tunnel settings.
Path A: Quick Link (No Account)
Open remote access in Mem
Open Settings → Access Mem Anywhere.
Turn on Allow devices on same Wi-Fi if you also want LAN access.
LAN authentication
When you enable this, an API key is automatically generated. Other devices on your network will need this key to connect. It's the same key used for access anywhere. You can copy it from the API Key section that appears below.
Choose Quick link and start
In Access from Anywhere, choose Quick link, then click Start.
Wait for status to become Live.
Copy URL and API key
In Ready to connect, copy:
- URL
- API key
Use Rotate if you want to issue a fresh key.
Verify from another machine
export NMEM_API_URL="https://<your-quick-link>"
export NMEM_API_KEY="nmem_..."
nmem status
Expected: status ok.
Linux / server network note
Some VPS, office, campus, or ISP networks block UDP/QUIC. Mem now retries Cloudflare tunnel startup with HTTP/2 automatically if QUIC fails during startup.
If you want to force TCP-only transport in a headless or systemd deployment, set:
export TUNNEL_TRANSPORT_PROTOCOL=http2Then restart Mem and start Access Anywhere again.
Path B: Cloudflare Account (Stable URL)
Prerequisite
You need a domain already in Cloudflare DNS (for example example.com) before this path can produce a stable URL.
Create a tunnel and copy the token
In Cloudflare Zero Trust:
- Open Networks → Connectors → Create a tunnel.
- Click Select Cloudflared.
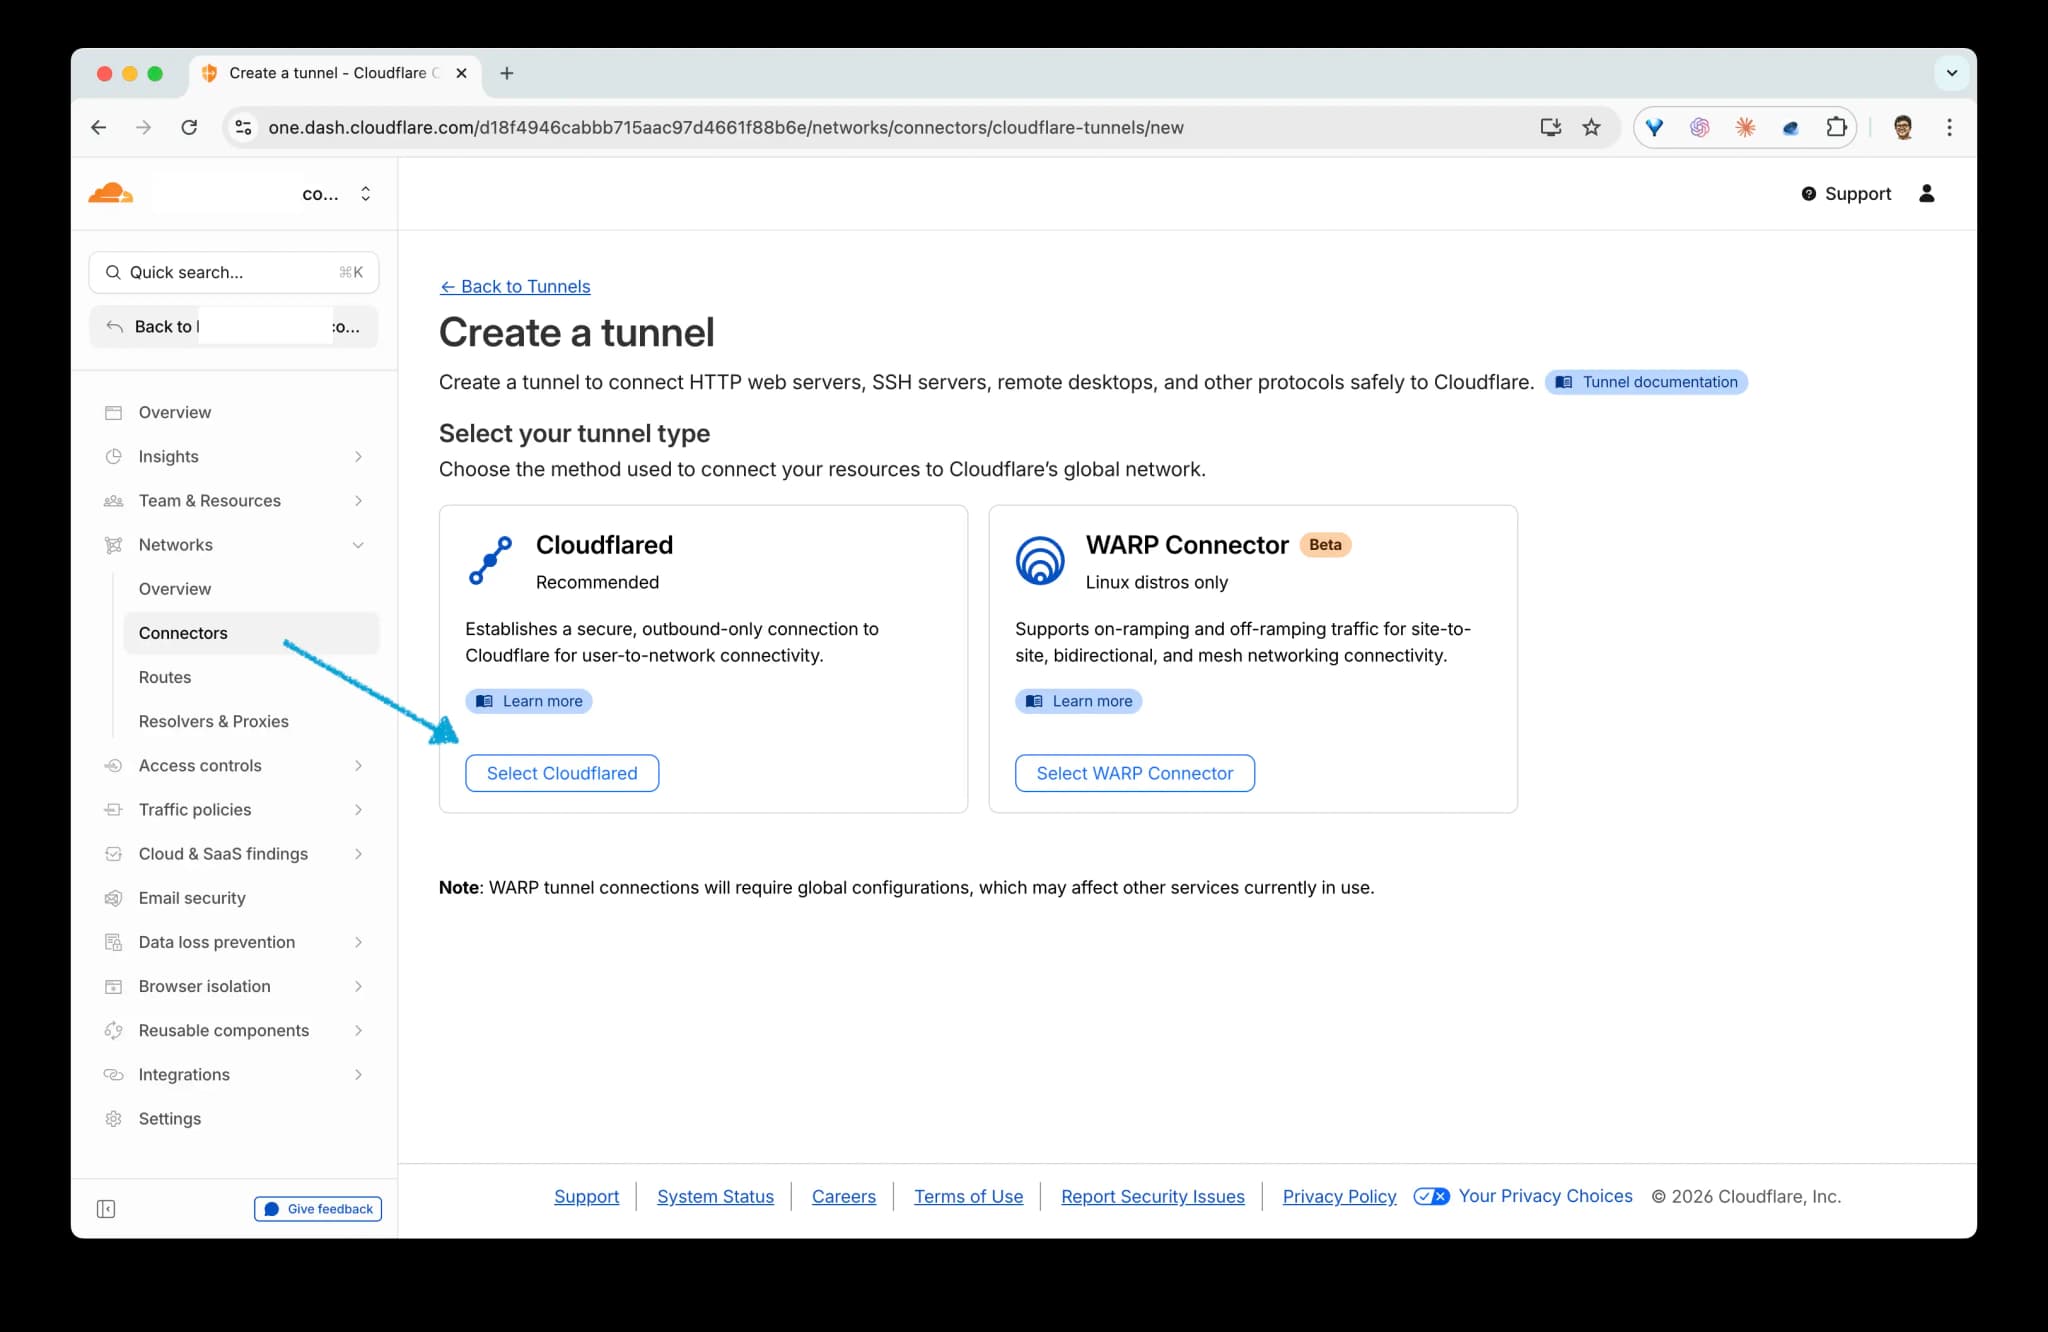
- Name the tunnel and click Save tunnel.
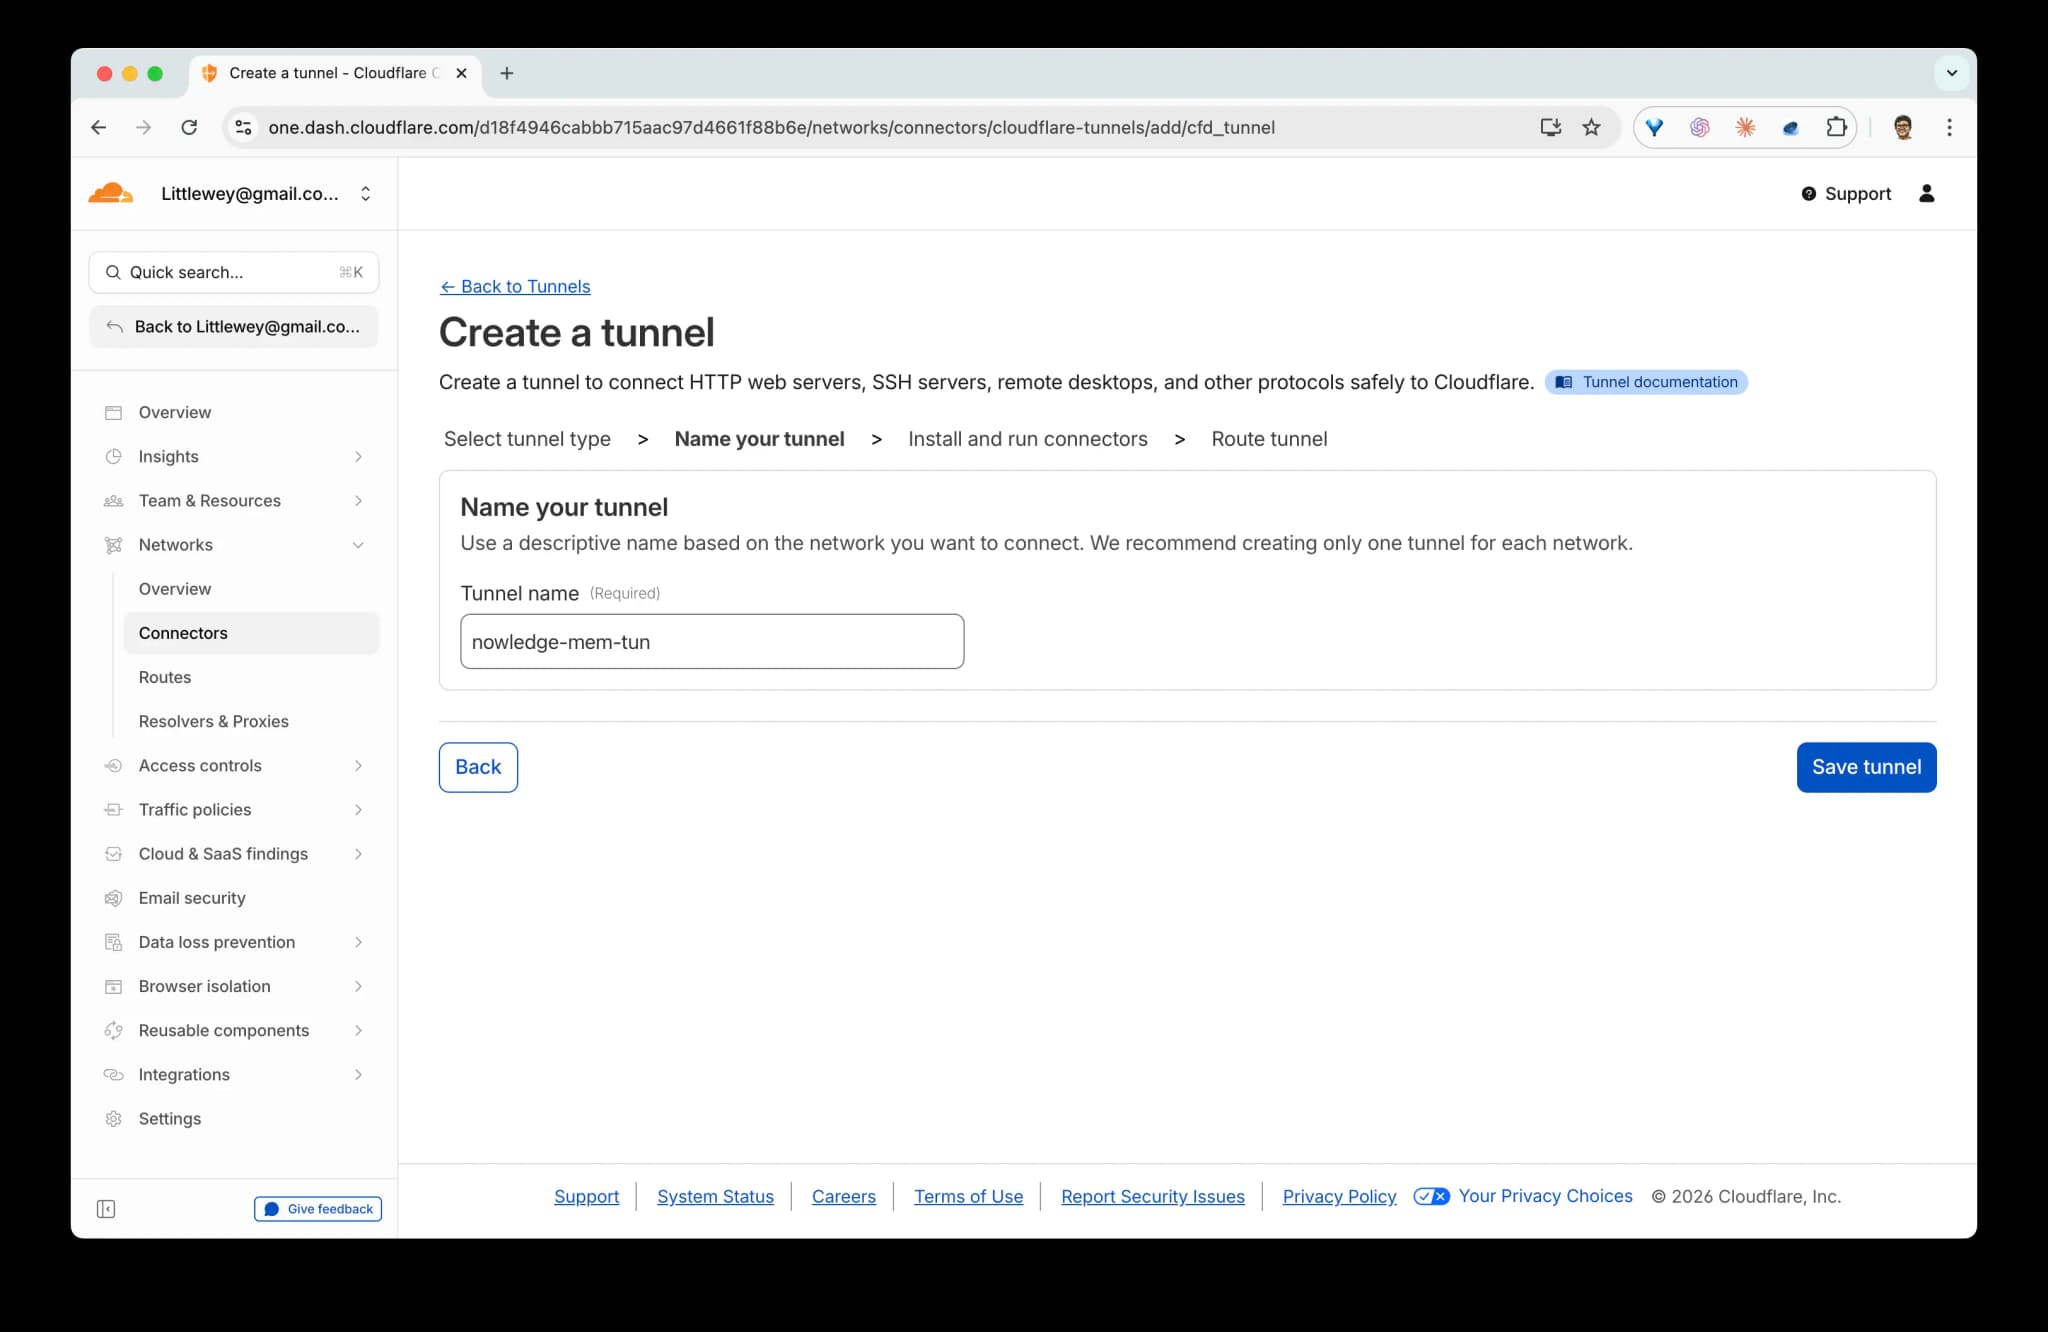
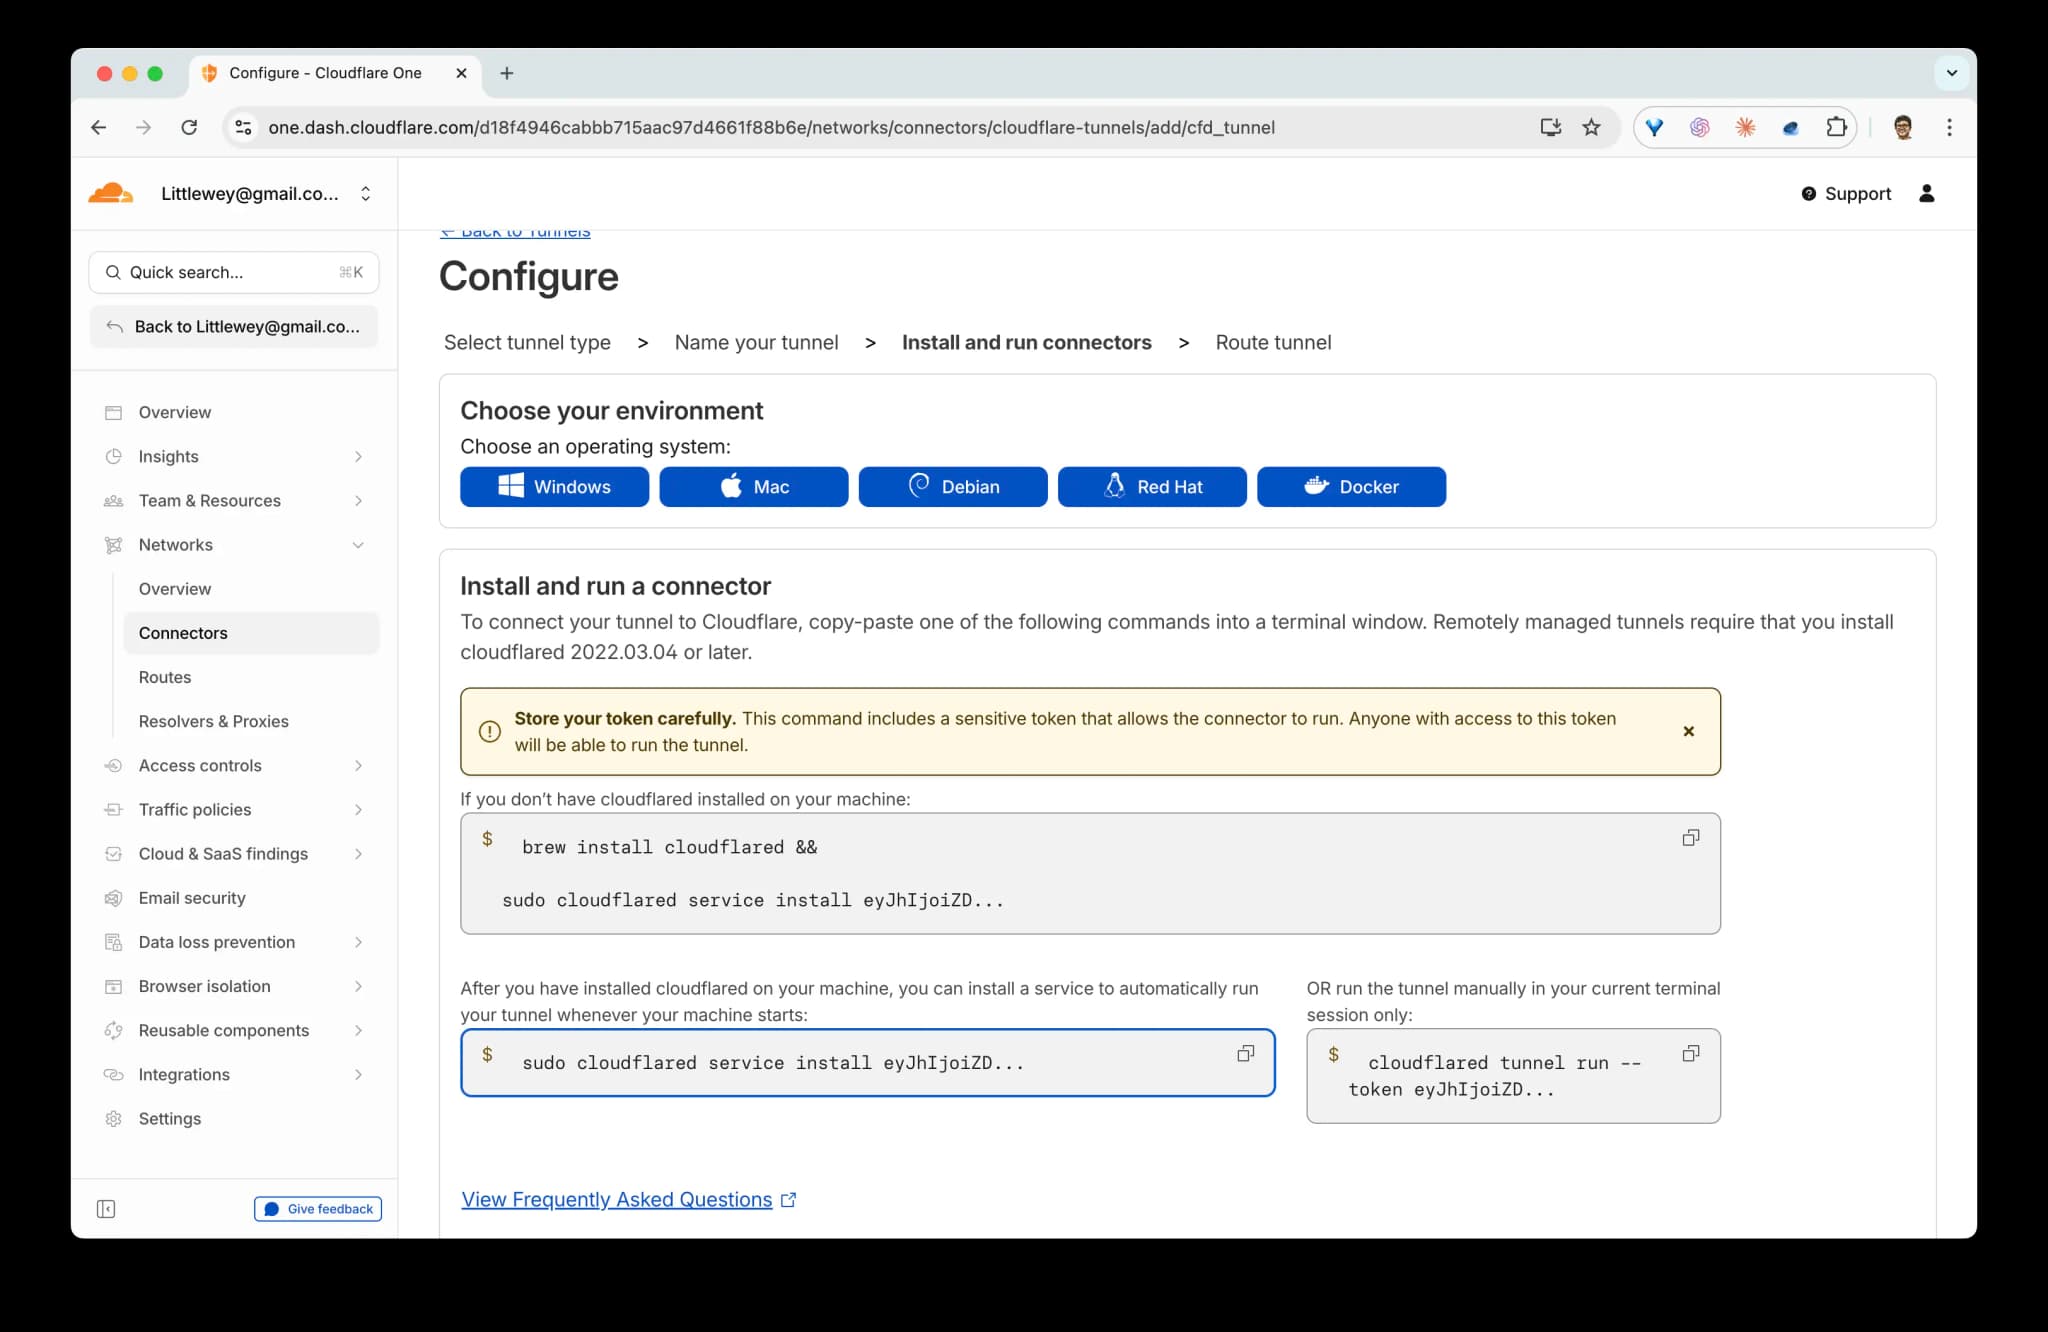
- In Install and run connectors, Cloudflare shows a command like:
sudo cloudflared service install ... <TOKEN>You do not run that command. Mem runs the tunnel for you; you only need the token from it. Copy the token, then in Mem paste either:
- the raw token, or
- the full command line (supported forms:
service install <token>,--token <token>,--token=<token>).
Mem extracts the token automatically.
Desktop and host install vs Docker
On the desktop app and .deb / AppImage host installs, Mem bundles its own cloudflared, so you never install or run it yourself. This is unchanged.
On the Docker deployment, cloudflared is now bundled in the image too (both the default and :cuda tags). Earlier guidance to install or run cloudflared as a separate sidecar in the container no longer applies: configure the tunnel from Settings → Access Anywhere or the in-container nmem CLI, and the server manages it.
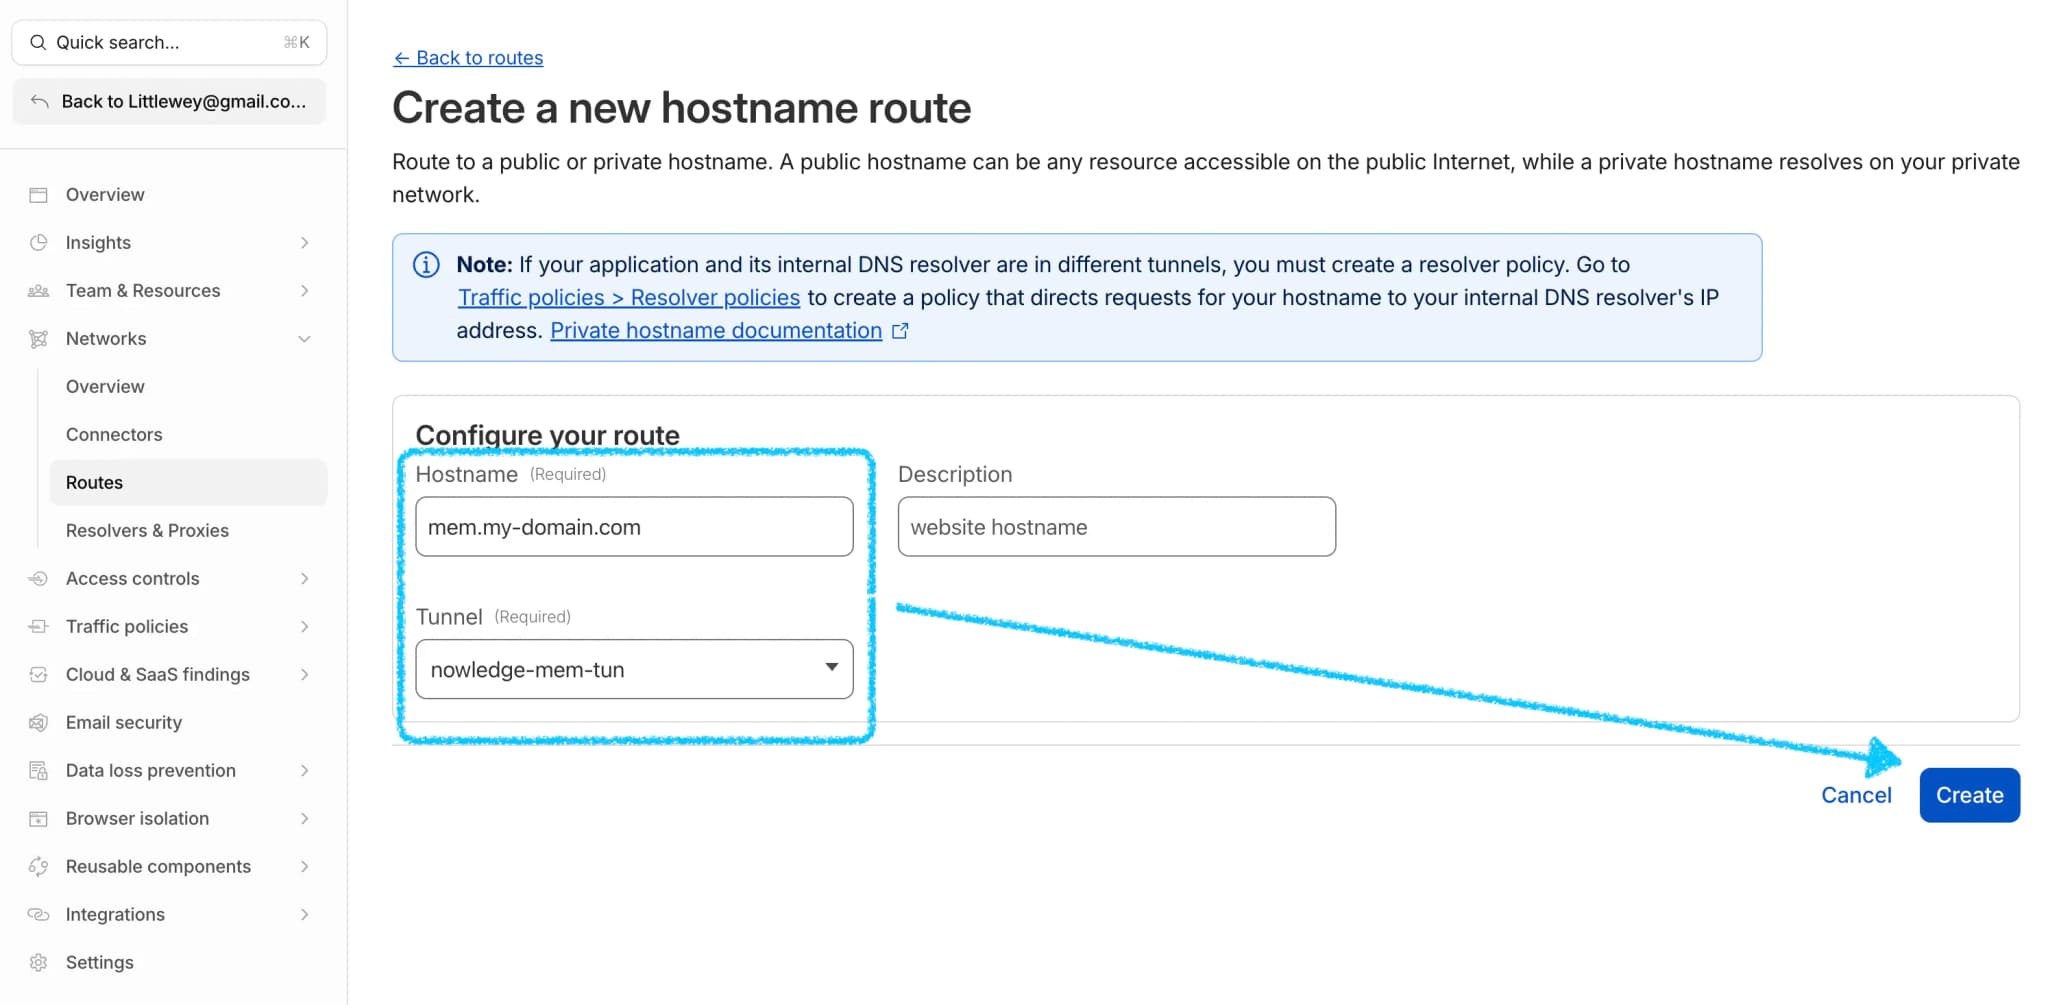
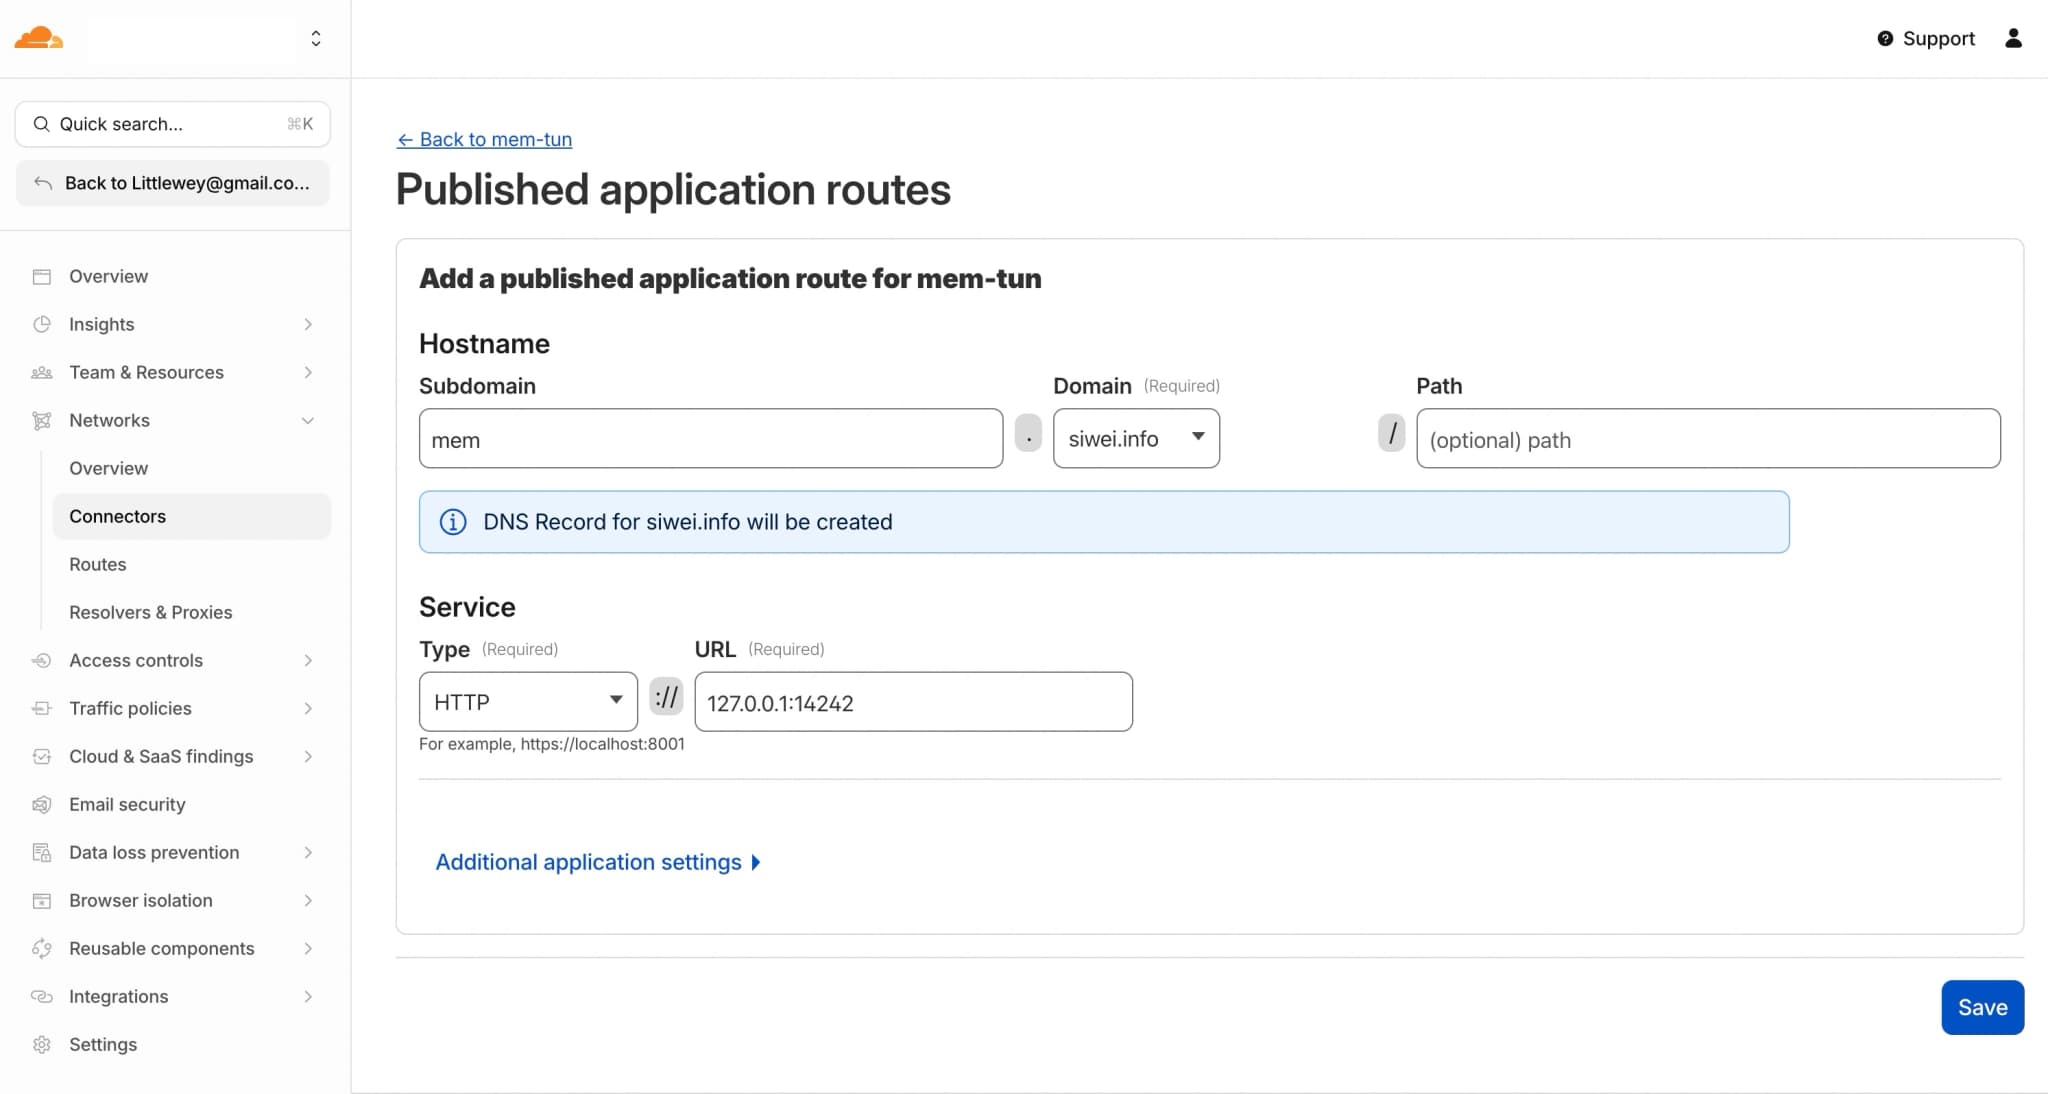
Create a public hostname route
In tunnel routing / hostname routes:
- Create a hostname (for example
mem.example.com). - Bind it to the tunnel you created.
This step creates your stable public URL.

Map the hostname to local Mem API
- Open Networks → Connectors → your tunnel.
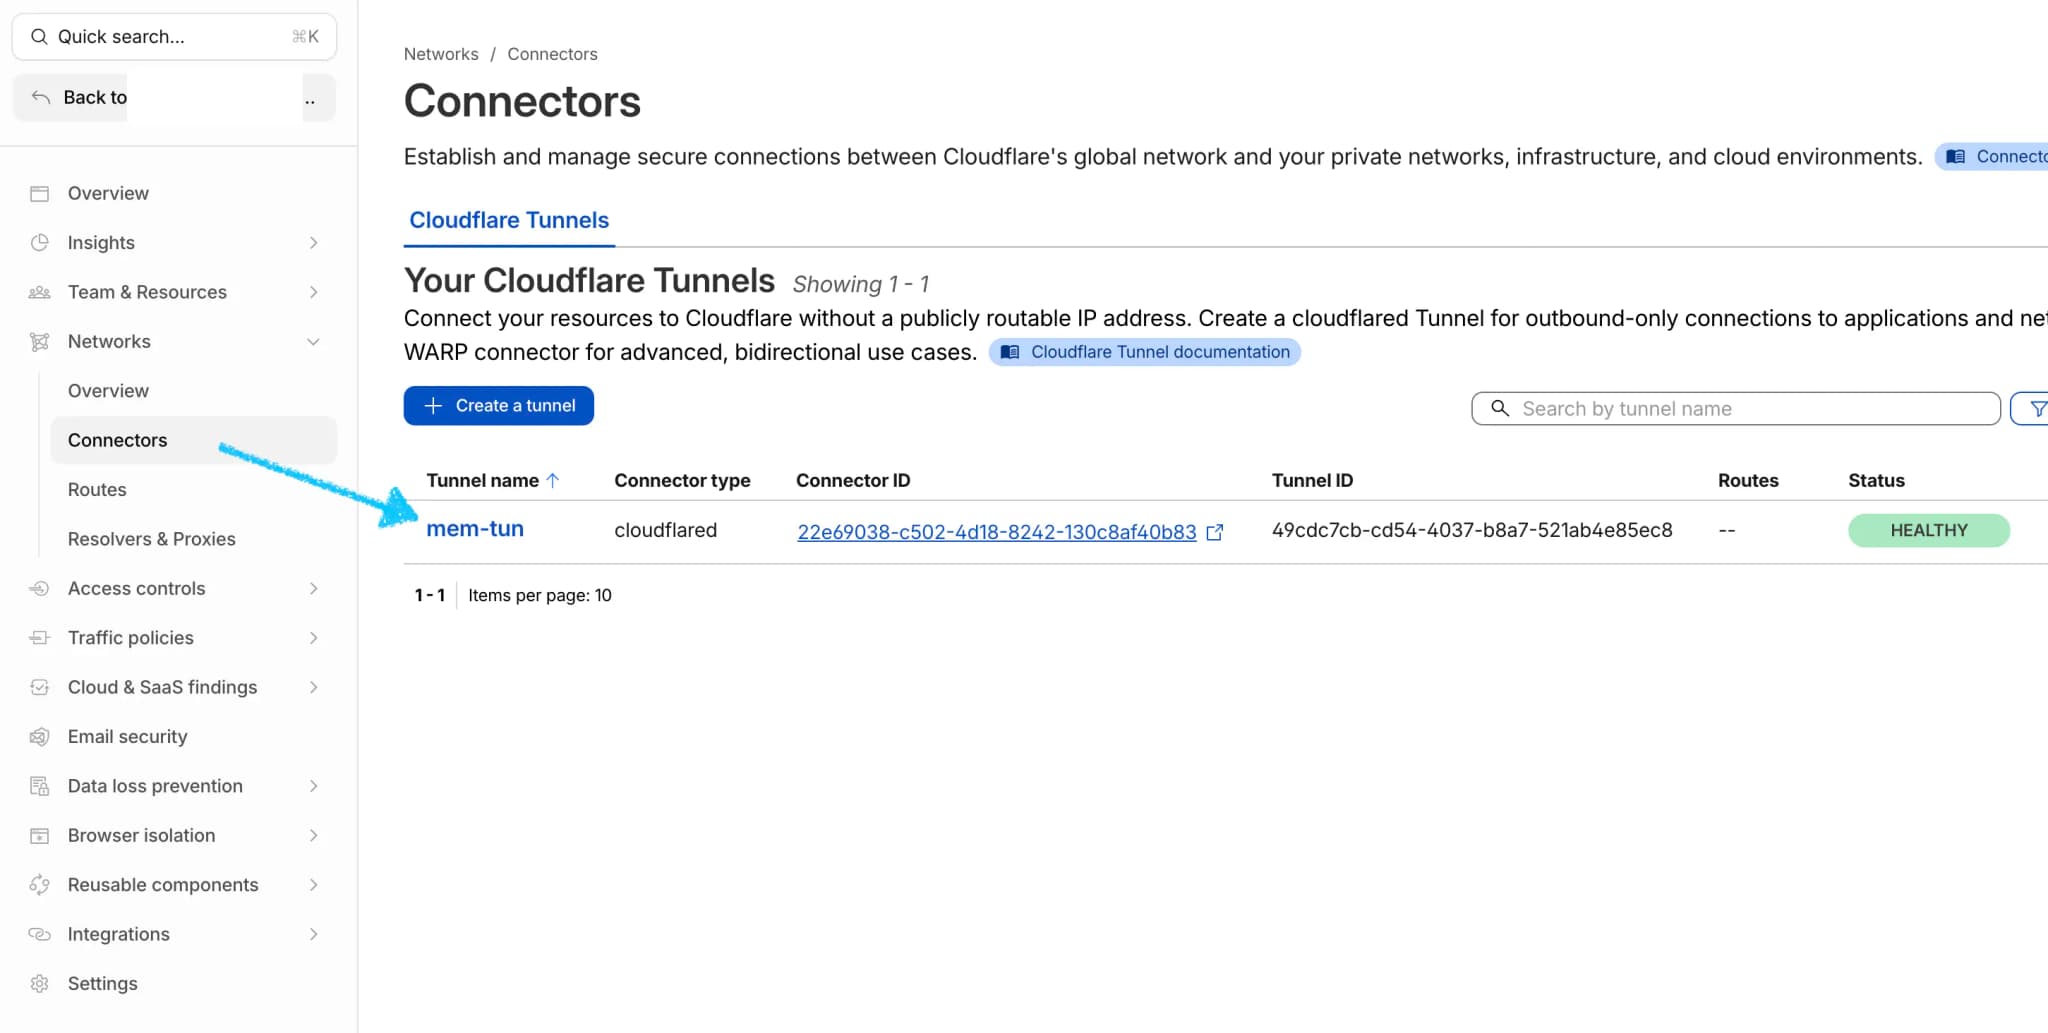
- In Published application routes, click Add a published application route.
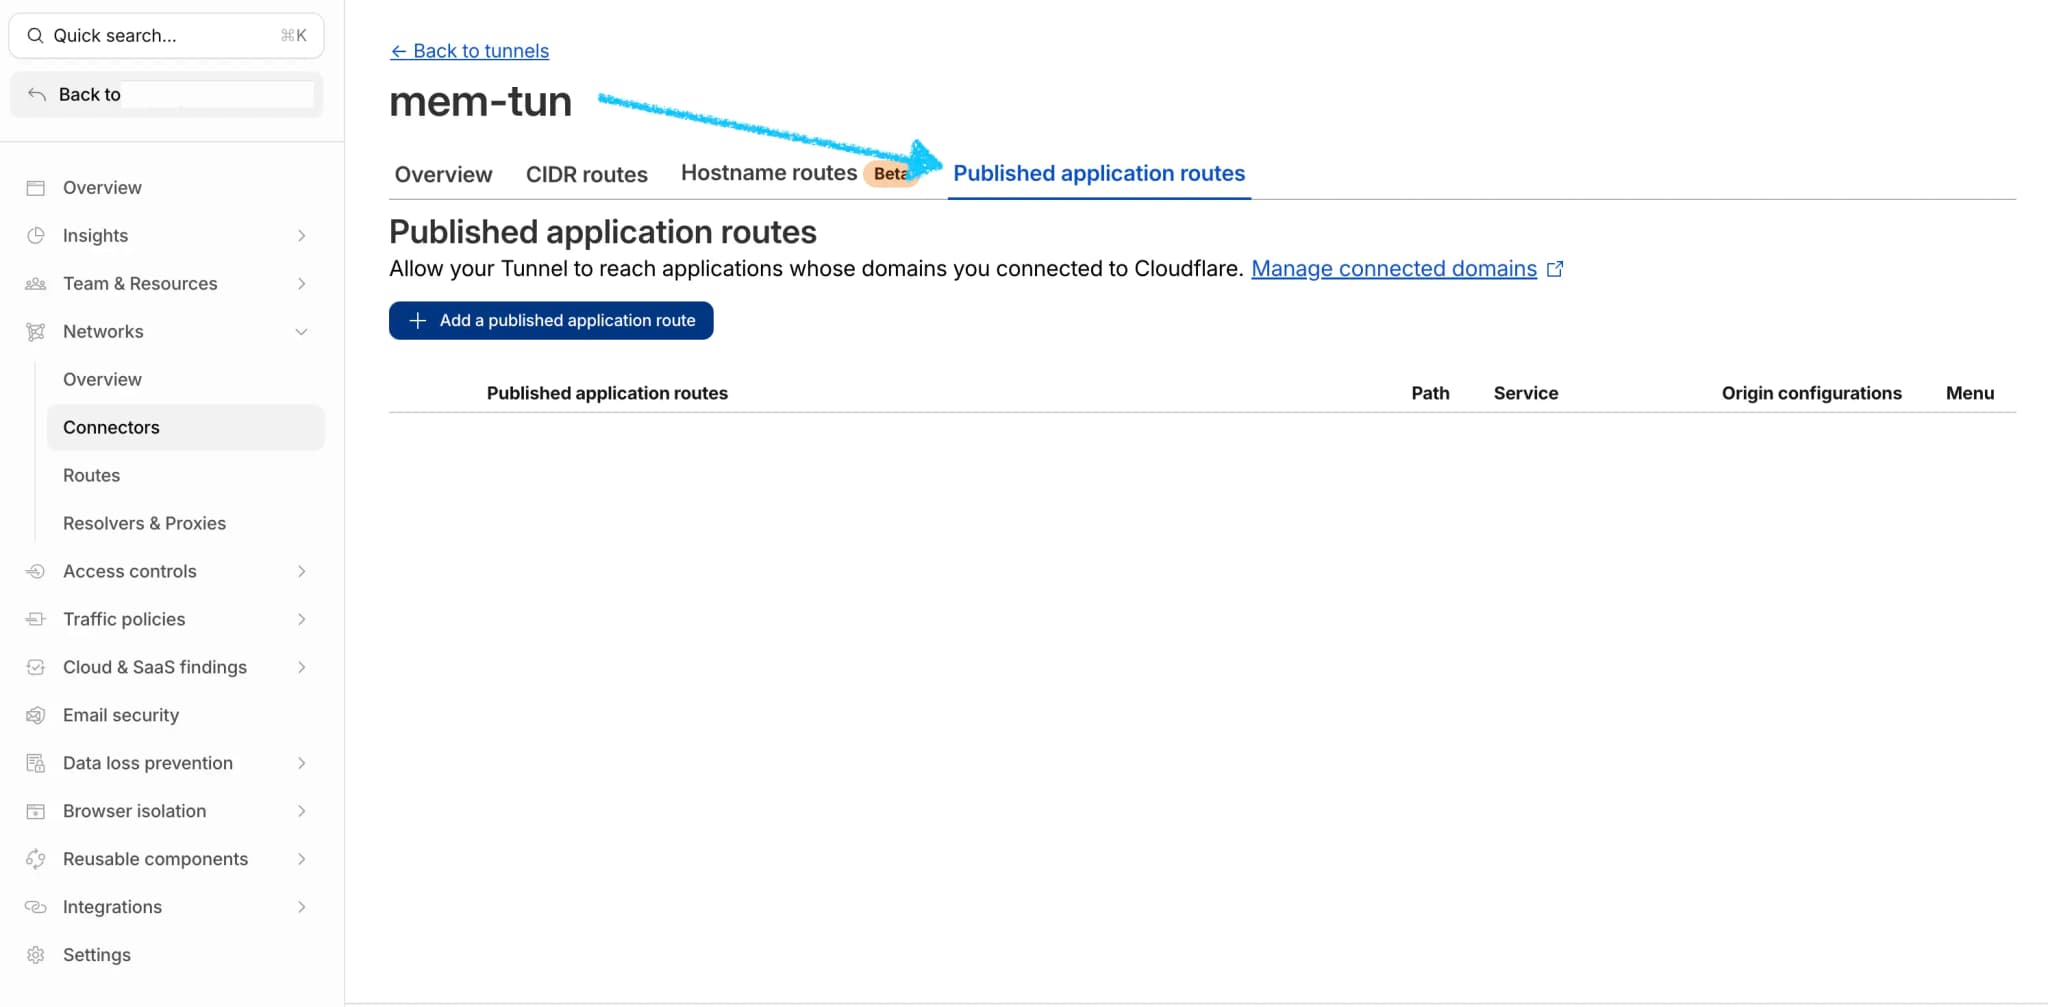
- Map
mem.example.comto your local Mem server:
- Subdomain:
mem - Domain: your Cloudflare-managed domain
- Service Type:
HTTP - Service URL:
http://127.0.0.1:14242
Do not append /remote-api.
Save and start in Mem
Back in Settings → Access Mem Anywhere → Cloudflare account:
- Public URL:
https://mem.example.com - Tunnel token: paste raw token or full
cloudflaredcommand
Then:
- Click Save
- Click Start
- Click Rotate if you want a fresh key
- Click Copy to copy URL and API key
Verify from another machine
export NMEM_API_URL="https://mem.example.com"
export NMEM_API_KEY="nmem_..."
nmem status
Expected: status ok.
Use It on Other Clients
Pick the connection path that matches your situation:
- Mobile app: native iOS or Android access from your phone or tablet
- Desktop app: full experience including AI Now from a second computer
- Web browser: quick visual access from any device
~/.nowledge-mem/config.json: the shared local client config written bynmem config client ..., reused automatically bynmem, OpenClaw, Bub, Claude Code, and other integrations- Browser extension: paste your URL + key in SidePanel settings
- ChatGPT / OAuth MCP clients: paste the public
/mcpendpoint and approve Mem through OAuth - Direct MCP: for MCP clients without a better dedicated path, or as the companion MCP layer for hybrid hosts like Codex
Mobile App (iOS & Android)
Alpha release
The mobile app is in alpha. iOS is available via TestFlight; Android is available as an unsigned APK. Reach out via Discord for TestFlight access, or download the APK from the community releases page.
The mobile app is a native wrapper that connects to your Mem server: no local database, no local Python backend. It gives you the full mobile experience: search, memories, threads, library, graph, and feed.
- Install the app (TestFlight for iOS, APK for Android)
- Enter your Mem URL and API key
- Tap Connect
The app stores your credentials locally and reconnects automatically on subsequent launches.
Desktop App (Client Mode)
Install Nowledge Mem on a second computer and connect to your main instance:
- Open Settings → Access Anywhere
- Enter the URL and API key from your main Mem
- Click Connect
You get the full desktop experience: search, memories, threads, library, graph, and AI Now. AI Now runs on the Mem server you connect to and uses that server's LLM configuration. No extra LLM setup is needed on the client.
The title bar shows Remote to indicate you're connected to another Mem. AI Now sessions, message history, and pasted images stay with that server so you can move between clients.
Web Browser
Open your Mem URL with /app appended (for example https://mem.example.com/app) in any modern browser.
Enter your API key to log in. You get search, memories, threads, graph views, and AI Now from the same server-backed session list.
This is the fastest way to check your knowledge base from a machine where you haven't installed the desktop or mobile app.
On mobile, the native app (above) is recommended. If you prefer the browser, tap Share → Add to Home Screen (iOS) or the install banner (Android) to save it as a shortcut. It opens full-screen without browser chrome.
nmem CLI
Auto-configured on the same machine. If you run nmem on the same computer as the desktop app, this file is created automatically when Access Anywhere generates an API key. You can skip straight to nmem status.
Configure this machine once so every nmem command, and every plugin that uses nmem, connects automatically:
nmem config client set url https://<your-url>
nmem config client set api-key nmem_...
nmem status # reads from config.json
nmem m search "project notes"The command writes the same local client config file that OpenClaw, Bub, Claude Code, Claude Desktop, and other integrations read. It is separate from nmem config access ..., which controls how a Mem server is exposed to other devices.
For CI or scripted setups, you can also use NMEM_API_URL and NMEM_API_KEY environment variables. Priority: CLI flags > env vars > config file > defaults.
Browser Extension (Side Panel Or Sidebar)
Open any supported AI chat page, then open Nowledge Mem Exchange in the browser side panel or sidebar:
- Click Settings
- In Access Mem Anywhere, paste the terminal setup copied from Mem Desktop:
export NMEM_API_URL="https://<your-url>"
export NMEM_API_KEY="nmem_..."- Click Fill URL + key
- Click Save
- Click Test connection (should show success)
You can also type URL + key manually in the same section.
ChatGPT / OAuth MCP Clients
Some cloud MCP clients, including ChatGPT Connectors, cannot use a private
nmem_ API-key header. For those clients, use Remote MCP over OAuth:
- In Mem, open Connectors → AI Tools → Remote MCP over OAuth.
- Click Start setup.
- Let Mem open the pairing page in the browser profile you will use for the AI client's OAuth approval.
- Copy the Access Anywhere MCP endpoint. It must end with
/mcp. - Paste that URL into the AI client's MCP connector setup.
- Approve Mem on the OAuth page in that same browser profile.
For ChatGPT, create the connector from ChatGPT Web settings. After it is
connected, the same connector is available in ChatGPT Web and the ChatGPT
desktop app; mention @Nowledge Mem in a chat when you want ChatGPT to search
Mem.
For ChatGPT screenshots, see ChatGPT Web and Desktop.
OpenClaw Plugin
If you already ran nmem config client ... on this machine, you're done. The OpenClaw plugin reads the same shared client config automatically.
You can also set credentials in the OpenClaw dashboard under Automation → Plugins → Nowledge Mem.
The API key is passed to the nmem subprocess via environment variable only. It never appears in logs or process arguments. Behavioral skills bundled with the plugin (like the memory guide) work the same in remote mode; they're part of the plugin, not the server.
Bub Plugin
Same shared client config. If you already ran nmem config client ... on this machine, the Bub plugin picks those credentials up automatically.
{
  "apiUrl": "https://<your-url>",
  "apiKey": "nmem_..."
}
Or set NMEM_API_URL and NMEM_API_KEY environment variables before running Bub.
Alma Plugin
Two options. Pick whichever fits your setup:
Option A: Plugin settings (recommended)
In Alma, open Settings and configure the Nowledge Mem plugin:
nowledgeMem.apiUrl: your remote URL (e.g.https://mem.example.com). Leave empty for local.nowledgeMem.apiKey: your Mem API key (nmem_...). Passed via environment variable only, never logged or shown in process arguments.
The plugin shows mode=remote or mode=local in its activation log so you can confirm which mode is active.
Option B: Environment variables
Set these in your shell before starting Alma:
export NMEM_API_URL="https://<your-url>"
export NMEM_API_KEY="nmem_..."
Both options are equivalent. Use Option A for a self-contained setup. Use Option B to keep credentials out of config files.
MCP / Agent Nodes
MCP clients connect via HTTP. The MCP host owns that connection, so it does not automatically read ~/.nowledge-mem/config.json.
If you already configured this machine with nmem config client ..., generate the exact host config from the same URL and API key:
nmem config mcp show --host codex
nmem config mcp show --host gemini-cli
nmem config mcp show --host cursor
nmem config mcp show --host claude-desktop
Paste the generated block into that host's MCP settings. It includes your API key when one is configured, so keep it in the host's private user config.
If you are writing the block by hand, pass your API key in the Authorization header, or use the X-NMEM-API-Key header.
Use the exact MCP endpoint with a trailing slash: https://<your-url>/mcp/.
Cursor (~/.cursor/mcp.json or workspace .cursor/mcp.json):
{
  "mcpServers": {
    "nowledge-mem": {
      "url": "https://<your-url>/mcp/",
      "type": "streamableHttp",
      "headers": {
        "APP": "Cursor",
        "Authorization": "Bearer nmem_..."
      }
    }
  }
}
or
{
  "mcpServers": {
    "nowledge-mem": {
      "url": "https://<your-url>/mcp/",
      "type": "streamableHttp",
      "headers": {
        "APP": "Cursor",
        "X-NMEM-API-Key": "nmem_..."
      }
    }
  }
}
Claude Desktop. If you use the Nowledge Mem extension, it reads the same shared client config as nmem:
- macOS / Linux:
~/.nowledge-mem/config.json - Windows:
%USERPROFILE%\.nowledge-mem\config.json
{
  "apiUrl": "https://<your-url>",
  "apiKey": "nmem_..."
}
If you're running Nowledge Mem Desktop on the same machine, this file is usually written for you automatically when you start Access Anywhere.
Alternatively, add an MCP server entry to ~/Library/Application Support/Claude/claude_desktop_config.json:
{
  "mcpServers": {
    "nowledge-mem": {
      "url": "https://<your-url>/mcp/",
      "type": "streamableHttp",
      "headers": {
        "APP": "Claude",
        "Authorization": "Bearer nmem_..."
      }
    }
  }
}
Codex (~/.codex/config.toml, shared by the desktop app and CLI):
If you are following the dedicated Codex guide, keep that plugin package in place. The package includes a local MCP endpoint by default. For remote Mem, run nmem config mcp show --host codex and paste the generated TOML into ~/.codex/config.toml.
Gemini CLI (settings.json, override for the Gemini extension):
If you installed the Gemini CLI extension, the extension includes a local MCP endpoint by default. For remote Mem, run nmem config mcp show --host gemini-cli and paste the generated JSON into Gemini's user settings.
Claude Code. Install the Nowledge Mem plugin for automatic Working Memory, search, and session capture. For remote mode, run nmem config client set url ... and nmem config client set api-key ... once on the client machine. The plugin's nmem commands read that same shared local config.
CI / other shell-based agents. Set NMEM_API_URL and NMEM_API_KEY environment variables. Same variables work in any shell context.
Remote mode still reads local agent session files on the client
For transcript-backed saves such as nmem t save --from claude-code, grok, gemini-cli, or codex, remote mode does not mean the Mem server reads those agent session files remotely. The client machine running the agent still performs local discovery and parsing, then uploads the normalized thread data to Mem.
Quick Health Check
curl -H "Authorization: Bearer $NMEM_API_KEY" "$NMEM_API_URL/health"Expected: health JSON response.
If wrong key:
curl -H "Authorization: Bearer wrong_key" "$NMEM_API_URL/health"Expected: 401.
If your proxy strips auth headers:
curl "$NMEM_API_URL/health?nmem_api_key=$NMEM_API_KEY"Security and Operations
- API key is required for every remote request, both tunnel and LAN connections.
- When LAN access is enabled, connections from other devices on your network require the API key. Connections from the same computer are always allowed without a key, unless you enable Require API key on localhost in Settings.
- Rotate key anytime in Settings (old key becomes invalid immediately).
- After your first successful Start, tunnel reconnects automatically on app restart until you click Stop.
- Browse-Now / Browser Bridge automation endpoints are local-only and are not exposed through Access Anywhere.
- Stop tunnel when remote access is not needed.
Troubleshooting
- Start timed out: your network/proxy may block Cloudflare traffic. Retry, or switch to Cloudflare account mode.
401 Missing API key: proxy likely removed auth headers. Updatenmem, or use query fallback for manual checks.429 Too many invalid auth attempts: wrong key was retried repeatedly. Re-copy key or click Rotate.